

Recently, I've been meaning to start learning React as it is one of the most popular frontend libraries out there for building professional-standard websites.
As I've started writing on Hashnode, I thought a great first project would be to create my own site which showed my articles in my own format. I decided to stick with vanilla CSS so that I wasn't taking on too many new things at once - although I don't know a lot of CSS either. 🤣
I already come from Angular where I have a decent amount of experience, however I've only worked on existing projects and not started from the ground up. I also already use TypeScript and I love the type-checking features it enforces, so I started straight with TS when I created my React app. Luckily this is really easy to do - after installing the necessary tooling (npm, node, VSCode), just run:
npx create-react-app my-app --typescript
This gets you a template project ready to go! If you'd prefer to start with JavaScript then simply omit the --typescript.
This article will be an overview of the steps I took to get my first website up and running, without going into any finer detail.
1. Getting the content
Maybe this isn't the order most people would go in, but I started with the APIs. One of the reasons I picked Hashnode was because it has a great API offering, and it uses GraphQL which allows you to request the exact data structure you want.
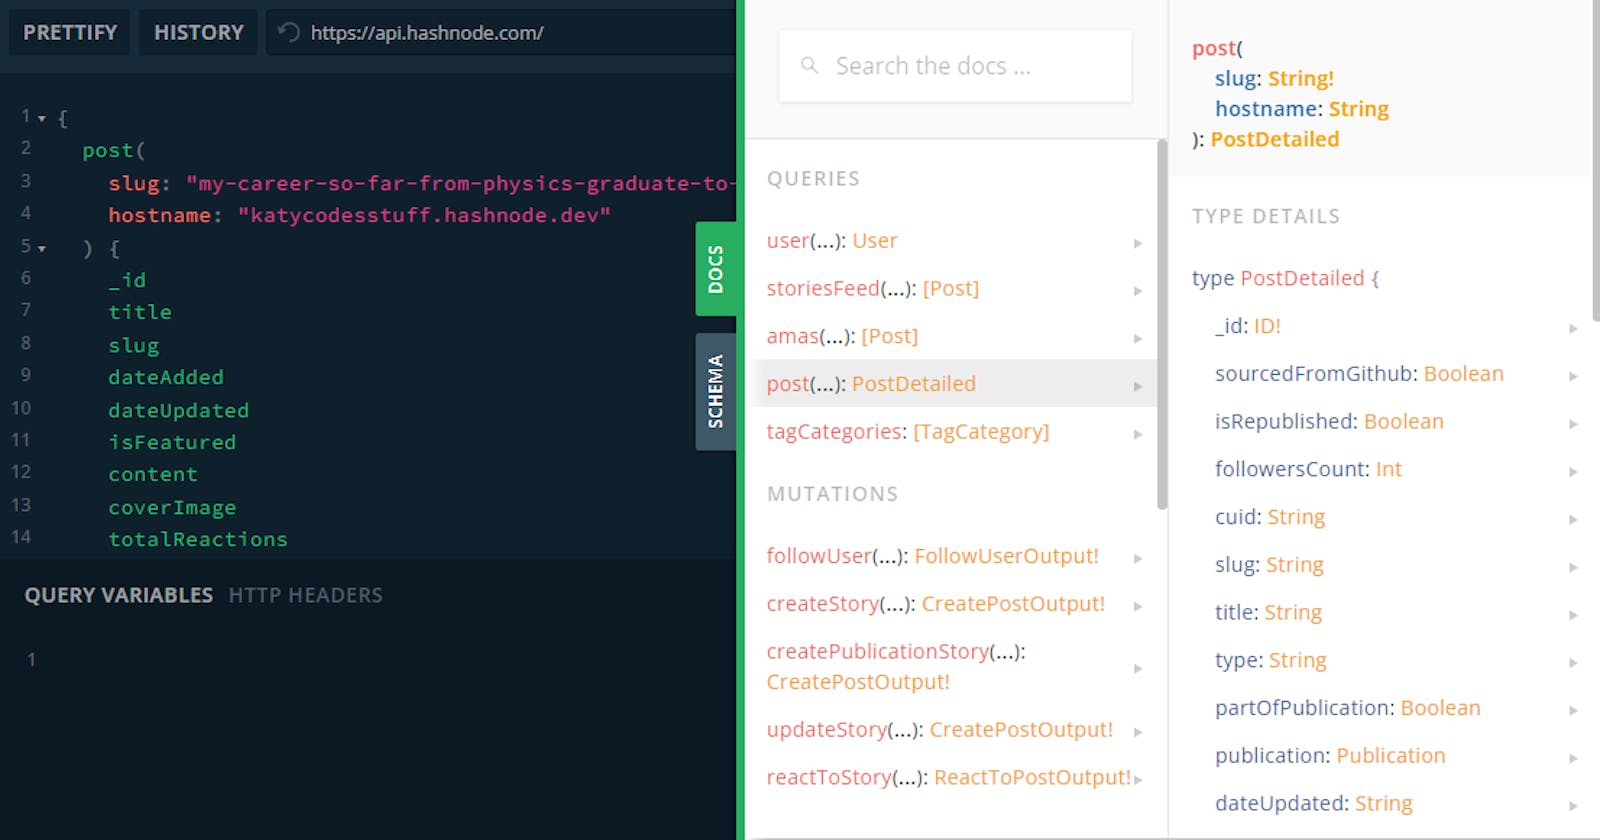
The API Playground allows you to build and try out your request first, and it has detailed documentation of the models available.
 A screenshot from Hashnode's API playground
Using the await/async Promises from JavaScript, I built a client class which called the API, and mapped the response to an interface I defined.
import { Article, ArticleSummary, HashnodeResponse } from "../models/hashnode";

export class HashnodeClient {

    public async fetchBlogPosts(): Promise<ArticleSummary[]> {
        let allBlogsFetched = false;
        let articles: ArticleSummary[] = [];
        let page = 0;
        const query = `
        query GetUserArticles($page: Int!) {
            user(username: "katycodesstuff") {
                publication {
                    posts(page: $page) {
                        title
                        brief
                        slug
                        totalReactions
                        dateAdded
                    }
                }
            }
        }`;
        while (!allBlogsFetched) {
            let response: HashnodeResponse = await this.makeGqlRequest(query, { page: page });
            articles.push(...response.data.user.publication.posts);
            if (response.data.user.publication.posts.length === 0) {
                allBlogsFetched = true;
            }
            page++;
        }
        return articles;
    }

    private async makeGqlRequest(query: string, variables = {}): Promise<any> {
        const data = await fetch('https://api.hashnode.com/', {
            method: 'POST',
            headers: {
                'Content-Type': 'application/json',
            },
            body: JSON.stringify({
                query,
                variables
            })
        });

        return data.json();
    }
}
2. Displaying the content on my page
The next step was to show my content on the webpage. For now I decided to use functional components with hooks, rather than go the class route.
In order to call APIs the recommended hook to use is useEffect. Combined with useState to manage the responses, I could display a list of blog post summaries on the page once the response had returned.
    const [articles, setArticles] = useState<ArticleSummary[]>([]);
    const [loading, setLoading] = useState<boolean>(true);

    useEffect(() => {
        async function func(): Promise<void> {
            const client = new HashnodeClient();
            const result = await client.fetchBlogPosts();
            const articles = result;

            setArticles(articles);
            setLoading(false);
        }
        func();
    }, []);
The main thing to remember with useEffect is if you do not specify a dependency array in the second argument, it will be fired every time a render happens. In my case, I simply needed to make one request then store the response in a state variable. To do this I specified an empty array [] to denote no dependencies, so the effect is only triggered the first time the page renders.
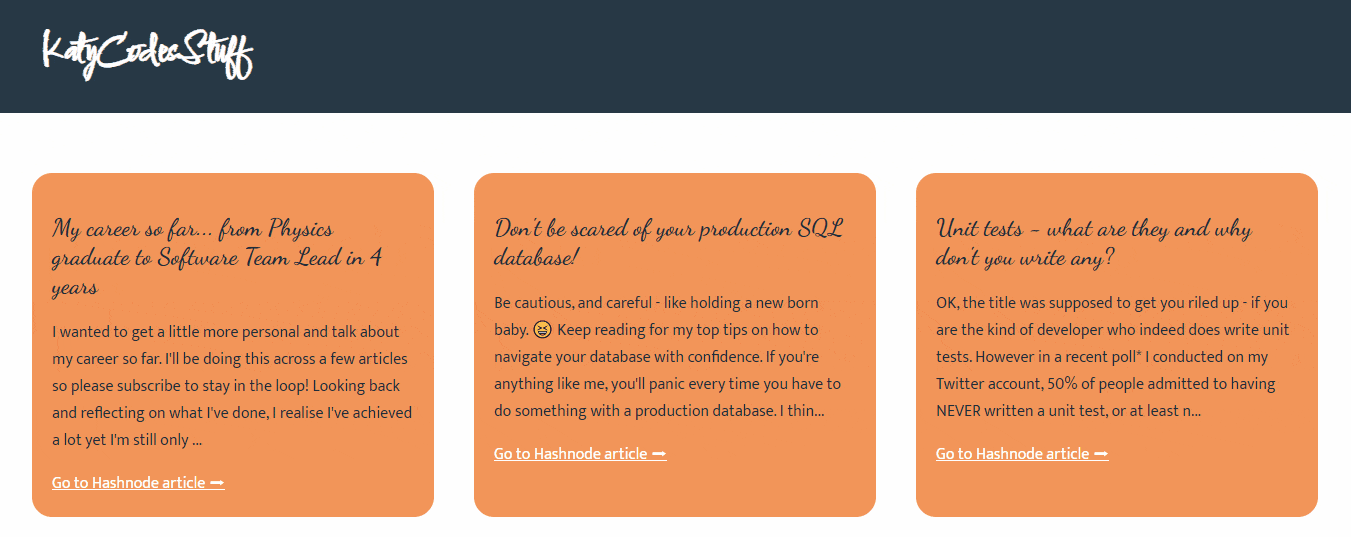
At this point, my website looked like this:
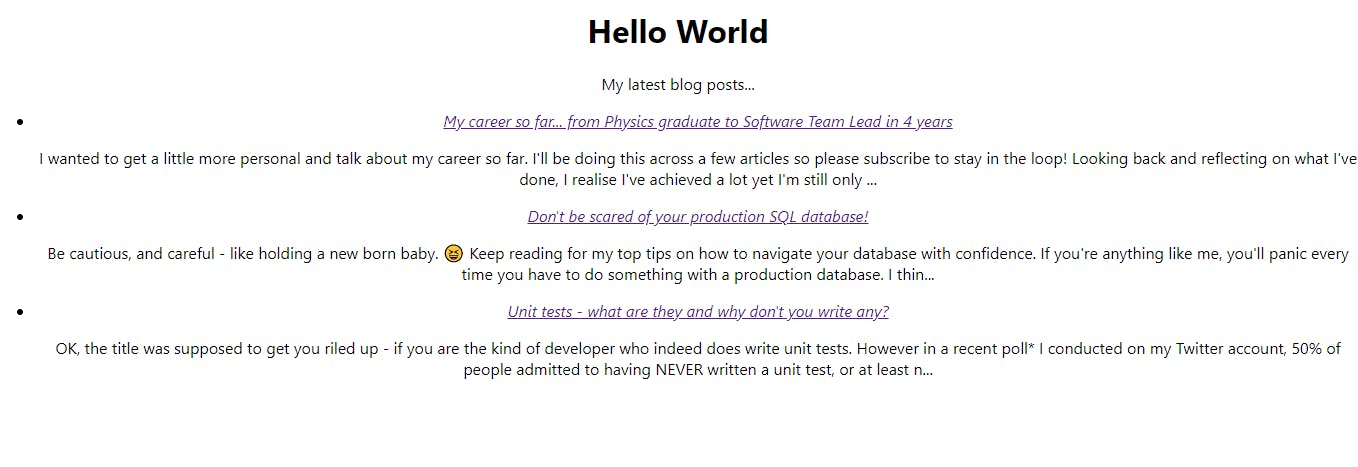 Iteration 1 - it doesn't look great but we have to start somewhere
3. The scary part - CSS
Obviously my website didn't look great at this point, so I began adding CSS. There's not really a short-cut to learning CSS, you just have to think about what you want it to look like and start googling! Throughout my website the main layout I used is flexbox, as this suited my needs well.
I went through many iterations as I tried to achieve article "summary boxes" which would grow slightly when hovered over with the mouse cursor.
For my colour-scheme, I used ColorHub, which is a great little site for finding simple but effective colour combinations, and it even generates the CSS for you.
For the fonts, I went to Google fonts, which explains how to add them to your project easily.
I settled on a orange, blue and white theme.
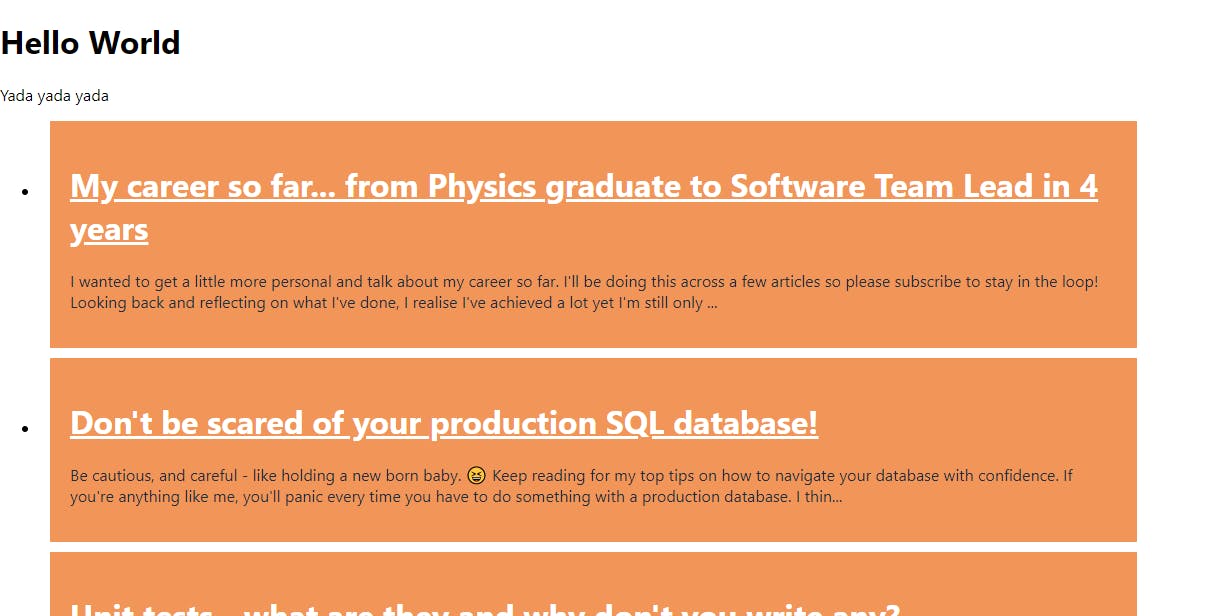 Iteration 2 - I started with a list of div blocks that I styled orange
After I had some content on the page, I decided to add a header next. To create a logo, I simply used another font from Google fonts.
 Iteration 3 - I moved to using gifs once I started adding some fancy CSS features
4. Refactor, refine, add new features
By this point, I felt like I was getting the hang of things.
Changing the header on scroll
I enhanced the header to change style on scroll - I did this with JavaScript and the useEffect hook, registering an event handler to the window.onscroll event which checked the position of the scroll, and then changed the HTML classes based on the position.
I'm not sure whether it's the "right" way to do it, but it works well. I used the window.onscroll event instead of window.addEventListener() function as my console logs were warning me I was getting a memory leak - this was due to when the Header component was unmounted, the event handler was still active and trying to set state on the unmounted component.
There is a removeEventListener() function but it didn't seem to be working as intended. With onscroll, I could simply set it to null on the component dismount.
function Header(props: Props) {
...
 const [scrolled, setScrolled] = useState<boolean>(false);
    useEffect(() => {
        if (!window.onscroll) {
            window.onscroll = () => { setScrolledFromWindow(scrolled, setScrolled); }
        }

        // returning a function cleans up during component dismount
        return () => { window.onscroll = null; };
    }, [ scrolled ]);
...
}

function setScrolledFromWindow(scrolled: boolean, setScrolled: (value: boolean) => void) {
    const scrollPx = 100;
    if (window.scrollY >= scrollPx && scrolled === false) {
        setScrolled(true);
    }
    else if (window.scrollY < scrollPx && scrolled === true) {
        setScrolled(false);
    }
}
Counter-intuitively, I had to set scrolled in the useEffect dependency array to get rid of a warning stating "React Hook useEffect has a missing dependency: 'scrolled'. Either include it or remove the dependency array react-hooks/exhaustive-deps"
Code snippets
Once my article summaries were displaying nicely with my header, the next feature on my list was being able to click on them to bring up the full article.
This required another API request to Hashnode's API to pull the full article which can be returned in HTML or Markdown.
It is worth mentioning that I had some difficulty with rendering the code snippets correctly. For some reason, they went past the bounds of my article elements despite the rest of the text wrapping correctly. It turned out the issue was to do with some pesky pre elements which wrap the code snippets from Hashnode.
The pre element means pre-formatted text, so any text within here will be displayed exactly as it's been written. This is a good thing for code snippets, where adding in new lines will create invalid code if it were to be copy-pasted somewhere else.
To fix my issue, I added a horizontal scrollbar to the pre element's styling so the reader could now see the code as intended, without going off the side of the page.
Routing
In order to show the article from the reader clicking on a blog summary, initially I did this in an over-complicated way by grabbing the article in the BlogSummary component, which had access to the setArticle method from a useState hook. This then set the article state which was used by a different component BlogPost.
The problem with this idea though, was that not only it was complicated and probably not a standard way of doing it, but also if anyone refreshed the page then the state would be reset and the article would not display. What I needed to include was routing, so that I could have paths in the URL which would always link to the correct article.
Introducing - react-router-dom!
This seems to be the standard way of routing in React. Unfortunately, there isn't any in-built support for routing so I installed the react-router-dom package and started following some tutorials. Unbeknownst to me, I'd installed v6 which had a load of breaking changes from v5, so it took a little while to find the right resources but in the end I got it working and I could now view my articles with a permalink.
 It was a bit of a faff to get routing working but it made my blog start to feel like a real website
Random blog button
For a bit of fun I also added a "Random article" button, which would use a list of article summaries from another Hashnode API request and then, using Math.random(), select a random article from the list. It's a simple but sweet little feature.
export class RandomArticle {

    public async getRandomArticle(): Promise<ArticleSummary> {
        const client = new HashnodeClient();
        const result = await client.fetchBlogPosts();
        const randomNum = Math.random();
        let randomIndex = Math.floor(randomNum * result.length);

        return result[randomIndex];
    }
}
Mobile support
From the beginning, I was trying to make sure what I did also looked good on mobile. To test my changes I used the Dev Tools (F12) and selected the Toggle Device Toolbar button to enable the mobile/small-device view. Also, you can even use your own phone to test with, provided you're connected to your LAN, by visiting your computer's local IP at port 3000. Find your local IP using ipconfig in the terminal.
 Using Chrome dev tools to test and debug my website in mobile view
If you're not familiar with using Dev Tools, it is well worth using. Obviously there's the console, where you can view console logs and errors. You can add breakpoints and step through JavaScript line by line. Another feature which is frankly amazing, is the ability to modify CSS in-place - so you can experiment in real-time directly on your application. Finally, the network tab is indispensable for viewing the outgoing API requests from your app.
In CSS, there's a neat way of changing your styling based on the size of your device's screen with the @media tag. This is the main way of making sure your app looks great for desktop and mobile.
header {
    display: flex;
    justify-content: space-between;
    flex-direction: row;
}
@media (max-width:780px) {
    header {
        flex-direction: column;
    }
}
Example of changing the flex-direction from row to column via CSS when the screen size goes below 780px
5. Making the site live
Once I was happy with how the site looked, and its functionality, I was ready to put it online. I decided to go with Netlify, as I've heard good things about it. It's really easy to get set up and you can get started for free.
After connecting my GitHub account, it provided a build server to build the React app and serve online at a netlify.app URL. If you want to use a custom domain, then it's as simple as buying the domain and then hooking up to Netlify by pointing the domain to Netlify's name servers.
Then in Netlify, go to the Domain section and add the custom domain. Finally, go to the Site section and add the domain to the site.
I also set an alias for the subdomain "blog" and set that to the primary site.
One thing to note - react-router-dom's routing is not supported by Netlify without adding a file to the "public" folder in your source code named "_redirects" with file content:
/* /index.html 200
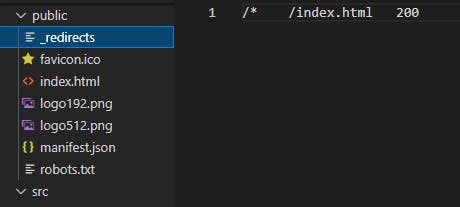 Add _redirects file to ensure routing works correctly
Lessons learned
Hopefully I've managed to give a flavour of how I built my first React website. It took me around 4 days to get it looking how I wanted it to, and ready to go live. It is still very basic, as it only shows read-only content from Hashnode - there are other APIs which would allow commenting and interacting with the posts which I haven't tried out yet.
By doing this project, I learned the basics of React and React hooks, I learned about a lot of CSS features including the flexbox layout, @media elements, CSS variables, and the difference between padding and margins. 😂 I also loved trying to design my own page, and now every time I visit a webpage or app I'm finding myself looking at how it's laid out and thinking about how to achieve it with CSS!
If I compare Angular to React, I much prefer React. It is simpler, more elegant and the JSX elements instead of HTML templates mean that everything is type-checked in VS Code which I love.
I would recommend anyone who is interested in learning React - whether a beginner or an experienced developer wanting to learn a new skill - to start with a simple project like this. Don't waste time following tutorials too closely as you can risk not actually absorbing the information! I feel like I have got a great grasp on React and CSS basics now, and I can't wait to build something else. This backend developer has been truly converted!
Visit the finished site at KatyCodesStuffBlog.
And if you're interested, the source code is on my GitHub.